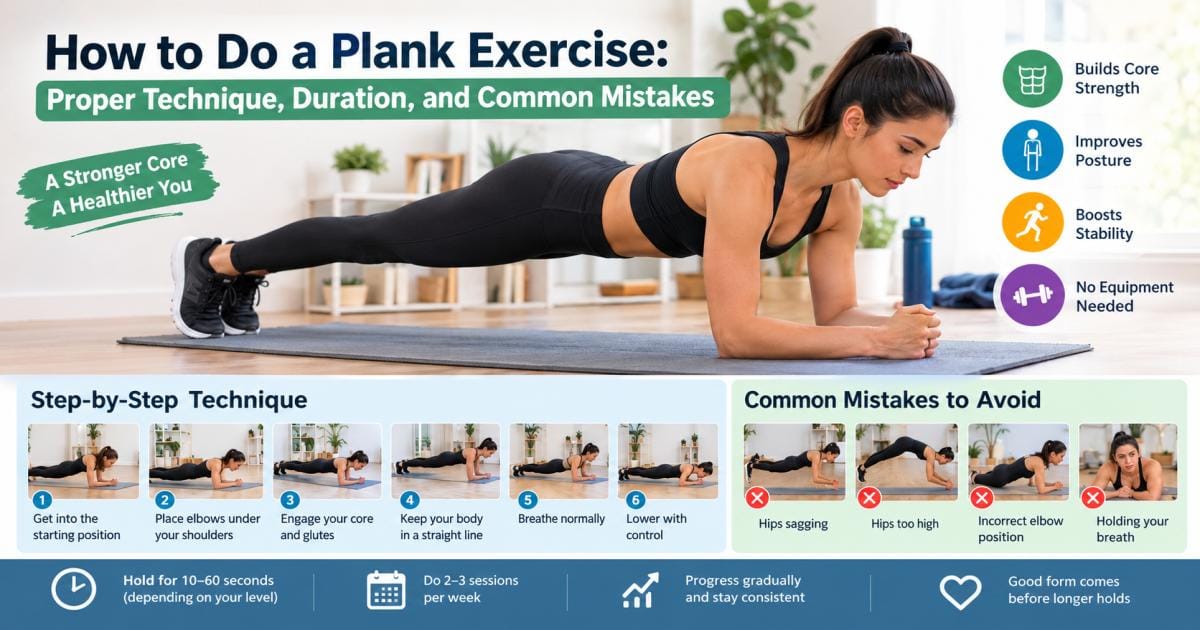

How to do a plank: rest on your forearms and toes with your elbows under your shoulders. Lift your hips and knees until your body forms one straight line from head to heels. Tighten your belly and glutes, look at the floor, and breathe steadily. Beginners typically hold for 20 to 30 seconds. Lower down as soon as your hips sag.
That is the short answer. The details decide whether a plank builds your core or strains your back. Many people drop their hips, hold their breath, or chase the clock. By 2015, record holders had planked for more than five hours. Spine researcher Stuart McGill told Men’s Health those holds have no use beyond the record, and his research favors repeated 10-second holds.
This guide answers the questions people ask most. What is the correct plank form? How long should you hold a plank? How often should you plank? Do planks burn belly fat? You’ll also get a three-week plan for plank exercise for beginners. All you need is a floor and a mat or folded towel.
Every number below comes from a named expert or study, linked in the Sources list at the end: Mayo Clinic physical therapists, Cleveland Clinic exercise physiologist Katie Lawton, the World Health Organization, and McGill’s research. This is general information, not medical advice.
What Is a Plank Exercise?
A plank is an isometric core exercise. You hold your body in a straight, still line while resting on your forearms or hands and on your toes. Isometric means your muscles tense, but your joints don’t move.
Cleveland Clinic exercise physiologist Katie Lawton compares the position to a plank of wood: straight and in line. Because a plank has no repeated movement, Mayo Clinic’s physical therapists say proper form matters even more.
A plank trains your core, the muscles between your pelvic floor and your diaphragm. Cleveland Clinic names three of them: the rectus abdominis (your abs), the obliques along your sides, and the deep transversus abdominis that wraps around your trunk. Your glutes, hamstrings, and lower back help too. Lawton says planks mainly teach you to brace your abs.
Planks need no gear and little time. Lawton calls them free and says they take only a couple of minutes. A mat or folded towel under your forearms is enough.
How to Do a Plank Correctly: Step-by-Step Instructions
To do a plank correctly, set your elbows under your shoulders, lift your hips and knees, hold one straight line from head to heels, brace your core and glutes, and breathe steadily. Here is the quick version. Each step follows in detail.
- Rest on your forearms and knees, with your elbows under your shoulders.
- Tuck your toes and lift your knees and hips off the floor.
- Tighten your belly and squeeze your glutes.
- Line up your head, hips, and heels, and look at the floor.
- Breathe slowly for the whole hold.
- Lower your knees first when time is up or your form slips.
Step 1: Get Into the Starting Position
Place a mat or folded towel on the floor. Start on your hands and knees, then lower onto your forearms. Keep your palms flat or make loose fists. Set your feet about hip-width apart.
Step 2: Position Your Elbows Under Your Shoulders
Put your elbows directly under your shoulders, not ahead of them and not wide. Mayo Clinic’s physical therapists give this cue for the forearm plank. Point your forearms straight ahead. Press the floor away slightly, so your upper back doesn’t sink between your shoulder blades.
Step 3: Engage Your Core and Glutes
Tuck your toes, then lift your knees and hips. Pull your belly in until it feels firm. Lawton says your abdomen should feel firm if someone poked it. She also advises a slight forward tilt of your pelvis with your glutes engaged. A glute squeeze typically keeps your hips level and spares your lower back.
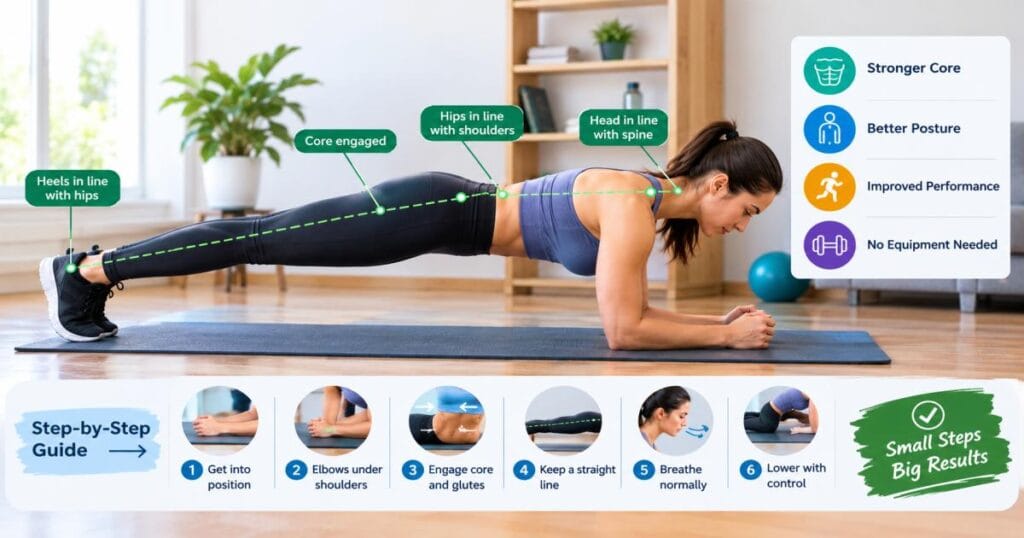
Step 4: Keep Your Body in a Straight Line
Picture a flat board from your head to your heels. Don’t let your hips sag or rise. Look straight down at the floor. Men’s Health says this keeps your spine neutral and spares your neck. Press your heels back and straighten your legs without locking your knees hard.
Check your line by filming yourself from the side. Lawton recommends a photo or video to spot form errors.
Step 5: Breathe Normally While Holding the Plank
Breathe in through your nose and out through your mouth. Count breaths instead of seconds: five slow breaths take roughly 20 to 30 seconds. Mayo Clinic advises against holding your breath or straining during strength exercises, because it can raise blood pressure sharply. Lawton adds that steady breathing helps you engage your core.
Step 6: Lower Your Body With Control
End the plank when time is up or your form slips, whichever comes first. Lower your knees first, then your hips and chest. Rest about a minute and shake out your arms. Mayo Clinic suggests repeating the hold two or three times.
How Long Should You Hold a Plank?
Most beginners should hold a plank for 10 to 30 seconds with good form, then work toward 30 to 60 seconds. Form matters more than the clock. Experts disagree on the ideal time, so here are four views.
- Mayo Clinic physical therapists: hold the knee or forearm plank for at least 30 seconds, building to 60, and repeat two or three times.
- Cleveland Clinic’s Katie Lawton: hold about a minute before you move to a harder version.
- Spine researcher Stuart McGill: use repeated 10-second holds. His six-week study favored them (details below).
- Strength coach Dan John: a fit, healthy man should reach two minutes, and longer holds add no value, according to Men’s Health.
This table blends those ranges into a starting guide.
| Level | Hold time | Sets | Rest between sets |
| Beginner | 10 to 20 seconds | 3 | 45 to 60 seconds |
| Building | 20 to 40 seconds | 3 | 45 seconds |
| Comfortable | 40 to 60 seconds | 2 to 3 | 30 to 45 seconds |
Plank Duration for Beginners
Beginners should start with 10 to 20 seconds. Pfizer’s health site suggests 10 to 30 seconds to start, and Men’s Health says 10 to 30 seconds is plenty for many people. Add 5 to 10 seconds when your form stays clean from start to finish. That matches Lawton’s advice to add time in 5- to 10-second steps.
Men’s Health puts the trade-off simply: a high-quality short plank, then rest, beats a poor-form hold that lasts several minutes. When you feel your muscles lose tension, drop down.
Is It Better to Hold One Long Plank or Several Short Planks?
Several short, clean holds usually beat one long hold. McGill tested this idea. In his six-week study, reported by Men’s Health, one group did planks, side planks, and bird dogs in 10-second holds. They did five sets of 5, 4, 3, 2, and 1 reps. That group gained the most torso stiffness. Half the participants were experienced Muay Thai fighters, so the results come from athletes.
Short holds work because form fades as time passes. A practical swap: do three 20-second planks with 45 seconds of rest instead of one 60-second plank.
How Often Should You Do Planks?
Plank two to four times a week, says Lawton. The World Health Organization also advises adults to do muscle-strengthening work on two or more days a week, alongside at least 150 minutes of moderate aerobic activity.
Beginners do well with three plank days a week and a rest day between each. Once you can hold more than a minute, Lawton advises moving to a new movement, such as reaching overhead during the plank, instead of adding more time.
Common Plank Mistakes and How to Fix Them
Six form errors cause most plank problems, and each has a quick fix. Film yourself from the side to find yours. Lawton says you shouldn’t feel back or shoulder pain in a plank, and that pain usually means your form is off.
Letting Your Hips Sag
Sagging hips are the most common plank mistake, according to a hospital health guide from Acibadem. Your lower back bends and absorbs strain that your core should carry.
Fix it: squeeze your glutes, tighten your belly, and shorten the hold. If your hips still drop, switch to a knee plank.
Raising Your Hips Too High
Hips that poke up like a tent typically shift the work from your abs to your shoulders and hamstrings.
Fix it: lower your hips until your shoulders, hips, and ankles line up. Check from the side. A broom handle along your back should touch your head, upper back, and glutes.
Placing Your Elbows Incorrectly
Elbows ahead of your shoulders or wide to the sides typically add strain to your shoulders and make balance harder. Mayo Clinic’s cue is to keep your elbows directly under your shoulders.
Fix it: look down at the start and check that each elbow sits under its shoulder. Point your forearms straight ahead and press the floor away.
Holding Your Breath
Many people hold their breath when a plank gets hard. Mayo Clinic warns that holding your breath and straining can raise blood pressure sharply. It also makes you tense, and it can leave you dizzy.
Fix it: breathe in through your nose and out through your mouth. Count five slow breaths per hold.
Arching Your Lower Back
Your ribs flare, your belly drops, and your lower back curves. That usually means your abs have tired and your back has taken over.
Fix it: pull your ribs down toward your hips, tilt your pelvis slightly forward, and squeeze your glutes. Shorten the hold. End the set if the pain stays.
Looking Forward and Straining Your Neck
Lifting your head to look ahead tightens the back of your neck and bends your spine out of line. Men’s Health advises looking directly down to keep your spine neutral.
Fix it: look at the floor between your hands, and keep the back of your neck long.
Different Types of Plank Exercises for Every Fitness Level
Five plank types cover every level, from a first-week beginner to someone who wants more challenge. Once you know how to do a plank on your forearms, you can move between these versions as your strength changes.
Forearm Plank
The forearm plank is the standard version: forearms and toes on the floor, elbows under shoulders. Men’s Health notes that a forearm plank challenges the core more, while a plank on your hands loads the shoulders and triceps more. It’s also typically gentler on your wrists. Start with 10 to 30 seconds.
Knee Plank for Beginners
The knee plank is a common starting point for new exercisers. Rest on your forearms and knees, and keep a straight line from head to knees. Lawton says that on your knees, you’re still bracing your core and abs and strengthening those muscles. Mayo Clinic’s therapists demonstrate this version and suggest 30 to 60 seconds. If that’s too long, begin with 10 to 15 seconds.
Incline Plank for Beginners
In an incline plank, your hands rest on a steady surface, such as a sturdy bench, kitchen counter, or wall, and your body forms a slanted straight line. The higher the surface, the easier the move. Choose something that won’t slide, and use a lower surface over time until you can plank on the floor.
Side Plank
Lie on your side with your elbow under your shoulder, then lift your hips to form a straight line from head to feet. Bend your knees and keep them down to make it easier. Mayo Clinic suggests 10 to 30 seconds, building toward 60. The side plank works your obliques. Lawton adds that for most people one side is weaker than the other, and side planks help even out that imbalance. Do both sides.
Plank With Shoulder Taps
Start in a high plank with your hands under your shoulders. Set your feet wider than hip-width for balance. Lift one hand, tap the opposite shoulder, and switch. Keep your hips still so they don’t rock. Try six taps per side. Add this move after you can hold a basic plank with clean form for 30 seconds.
How to Make Planks Easier or More Challenging
A plank should feel hard but steady. If you shake, sag,g or hold your breath, the version is too hard today. If you hold 60 seconds without effort, it’s too easy.
Beginner Modifications for Building Core Strength
- Drop to your knees. Lawton calls this a modified plank, and it still works your core.
- Use an incline. Rest your hands on a counter, bench, chair, or wall.
- Shorten the hold. Ten clean seconds beat thirty messy ones.
- Widen your feet. A wider stance steadies you.
- Rest longer. Take 45 to 60 seconds between sets.
How to Progress to a Full Plank
Lawton’s own model is a good guide. Build to three sets of one minute on your knees, then move to a forearm plank and restart at about 30 seconds per set. This gentler version works for most beginners:
- Hold a knee plank for 3 sets of 20 to 30 seconds.
- Add 5 to 10 seconds per session until you reach 3 sets of 30 to 60 seconds.
- Try a forearm plank for 3 sets of 10 seconds.
- Add 5 to 10 seconds each week while your form stays flat.
- Aim for 3 sets of 30 seconds, then add time or try a harder version.
You can also mix versions. Do your first set on your forearms, then drop to your knees for the last set when your form fades.
When to Try Advanced Plank Variations
Try harder versions once you can hold a forearm plank for 45 to 60 seconds, for two or three sets, with clean form. Lawton suggests rocking forward and back, lifting a leg, or reaching overhead. Other options include:
- Plank with shoulder taps
- Side plank with your top arm raised, which Pfizer’s health site lists as a way to make it harder.
- Walking plank, moving your hand and foot to the side and back
- Plank with a slow leg lift
Lawton advises that once you can hold more than a minute, you add a new movement instead of more time.
What Are the Benefits of Doing Planks?
Planks build core strength, teach you to brace, and fit into almost any routine. Lawton lists five benefits: convenience, back protection, injury prevention, better posture habits,s and a mental lift. Here is how they show up.
Builds Core Strength and Stability
A plank trains your trunk muscles to hold your spine steady. McGill was among the first researchers to show that core muscle endurance matters more than raw strength for stabilizing the lower back, according to Men’s Health. A plank trains exactly that kind of endurance.
Helps Improve Posture and Body Control
Lawton says planking alone won’t fix your posture. But the habit of bracing your core through the day may help you sit and stand straighter. A plank also teaches you to feel when your hips, ribs, and back drift out of line, and that awareness typically carries over to other exercises.
Supports Everyday Movement and Exercise Performance
Lawton says a strong core protects your spine when you lift a child or lean forward to unload a dishwasher. She adds that squats, deadlifts, and overhead presses are hard to do safely without a strong core, because you need to keep your spine straight. Planks build that bracing skill.
Planks may ease back pain for some people, but not for everyone. If you have a history of back pain, Lawton suggests asking a physical therapist how to plank safely.
Works Multiple Muscle Groups Without Equipment
A plank works your abs, obliques, and deep core muscles. Cleveland Clinic adds that it also activates your glutes, hamstrings, and lower back. Your shoulders and arms hold you up too. You need no weights, no machine, and no gym, and Lawton says you can do it anywhere.
Can Planks Help You Lose Belly Fat or Get Abs?
Planks can’t target belly fat, but they do strengthen the muscles under it. Fat loss happens across your whole body, and visible abs depend mostly on how much fat covers them.
Do Planks Burn Belly Fat?
No. Your body can’t choose to burn fat from the area you train. Scientists call this idea spot reduction, and studies don’t support it.
In a randomized trial of 24 adults, one group did seven abdominal exercises, two sets of 10 reps, five days a week for six weeks. That adds up to about 4,200 reps per person. Their ab endurance rose, but compared with a control group, their abdominal fat, skinfold thickness, and waist size didn’t change. The moves were crunch-style exercises, not planks, but the same biology applies.
An older study of 19 people points the same way. After 27 days of sit-ups, about 5,004 per person, fat cells shrank by a similar amount in the abs, under the shoulder blade, and in the glutes. The authors of the six-week trial concluded that aerobic exercise plus a lower calorie intake is likely needed to change body fat.
Can Planks Help Strengthen and Define Your Abdominal Muscles?
Planks strengthen your abs, but they don’t guarantee a six-pack. Lawton says the six-pack promise is overblown and tied more to diet. Planks build the muscle. Diet and daily activity decide how much of it you see.
Why Diet and Overall Physical Activity Matter
To lose body fat, you typically need to burn more energy than you eat over time. Activity covers one side of that equation. Food choices cover the other.
The World Health Organization advises adults to get at least 150 minutes of moderate aerobic activity a week, plus muscle-strengthening on two or more days. Brisk walking, cycling and swimming all count. Planks cover part of the strength side. A practical weekly mix looks like this:
- Walk, cycle or swim on most days, aiming for 150 minutes of moderate activity.
- Plank and do other strength work two to four times a week.
- Eat in a way you can keep up for months, not days.
Plank Exercise Safety Tips for Beginners
For most healthy adults, a plank is safe when you learn good form and build up slowly. Pain is a signal to change something. Lawton says a plank shouldn’t hurt your back or shoulders, and that pain usually means your form is off. These habits lower your risk.
How to Protect Your Lower Back and Shoulders
- Warm up first. Spend a minute on arm circles, marching in place, and cat-cow on your hands and knees.
- Brace before you lift. Tighten your belly and glutes before your hips leave the floor.
- Keep holds short. McGill told Men’s Health he has seen plank-related injuries in people with back pain who used inappropriate durations.
- Press the floor away. This keeps your shoulders from collapsing toward your ears.
- Use a mat or towel under your forearms.
- Check your form on video. Lawton recommends a photo or video.
- Mind the heat. In hot weather, plank in a cool room and drink water first.
When to Stop Doing a Plank
Stop right away if you feel any of these:
- Sharp pain in your back, neck, shoulders, or wrists
- Numbness or tingling
- Dizziness or chest discomfort
- Pain that stays after you finish
- Form that falls apart, such as sagging hips
A hospital health guide from Acibadem says sharp pain, dizziness, numbness, or symptoms that keep coming back in the neck, shoulders, wrists, or lower back deserve attention. Mild muscle burn is typically normal. Sharp or lasting pain isn’t.
Who Should Seek Professional Advice Before Planking?
Talk to a doctor or physiotherapist first if any of these apply to you:
- You have back, neck, shoulder, or wrist pain now, or a past injury
- You’ve had recent surgery
- You’re pregnant, or you recently had a baby
- You have severe osteoporosis or balance problems
- You have a heart condition or high blood pressure
Mayo Clinic says to check with your health care provider before isometric exercise if you have high blood pressure or any heart problem. Acibadem’s guide also lists recent surgery, pregnancy-related concerns, severe osteoporosis, balance problems, and active musculoskeletal pain as reasons to ask a clinician first. A professional can suggest a version that suits your body.
A Simple Beginner Plank Workout Plan
This three-week plan takes about 10 minutes per session. Train three days a week with a rest day between. Warm up for a minute first, and choose the plank type that keeps your line straight.
| Week | Goal | Plank type | Hold time | Sets | Rest between sets |
| 1 | Learn the form | Knee or incline plank | 15 to 20 seconds | 3 | 60 seconds |
| 2 | Build hold time | Forearm plank (or knee plank if needed) | 20 to 30 seconds | 3 | 45 to 60 seconds |
| 3 | Build endurance | Forearm plank, plus side plank | 30 seconds (side plank 10 to 15 seconds per side) | 3 (side plank 2) | 45 seconds |
Week 1: Learn the Correct Plank Form
Focus on the six steps, not the clock. Plank on your knees or with your hands on a counter. Set up with your elbows under your shoulders, your belly and glutes tight, and a flat back. Film yourself from the side once per session, as Lawton advises. Fix sagging or raised hips before you move on. If you finish strong, try one 10-second forearm plank.
Week 2: Build Your Holding Time Gradually
Move to forearm planks if your form allows. Start at 20 seconds and add about 5 seconds per session while your form stays clean. Lawton suggests adding time in 5- to 10-second steps. If your form fades, drop to your knees for the rest of the set.
Week 3: Improve Core Endurance
Aim for three forearm planks of about 30 seconds each. That sits inside Mayo Clinic’s 30-to-60-second range. Add two short side planks per side, 10 to 15 seconds each. Side planks train your obliques, which a front plank works less.
How to Track Your Progress Without Sacrificing Form
Log three things after each session: the plank type, the seconds you held with good form, and a form score from 1 (poor) to 5 (flat and steady). Count only the time before your form slipped.
A few rules keep the log honest:
- Add time only when your form score is 4 or 5.
- At a score of 3 or lower, keep the same time or shorten it.
- Stop 2 or 3 seconds early rather than at total failure.
- Re-film yourself once a week and compare.
After week 3, add 5 to 10 seconds a week, or move to a harder version such as shoulder taps. For a tougher option, borrow from McGill’s study format: 10-second holds in five sets of 5, 4, 3, 2 and 1 reps, resting between holds.
Final Thoughts
Learning how to do a plank comes down to form, not time. Put your elbows under your shoulders, keep one straight line, brace your belly and glutes, breathe, and stop when your form slips.
Key takeaways:
- Hold for 10 to 30 seconds at first, then build toward 30 to 60 seconds.
- Repeat short, clean holds instead of one long, sloppy one.
- Plank two to four times a week, with rest days in between.
- Use a knee or incline plank if you need one.
- Planks build core strength. They don’t burn belly fat on their own.
If you have pain, an injury, or a heart or blood pressure condition, check with a doctor or physiotherapist first. Then start Week 1 of the plan: set a timer for 15 seconds and make your first plank a clean one.
FAQs
How do you do a plank for beginners?
Start on your knees or with your hands on a counter. Place your elbows under your shoulders, tighten your belly and glutes, and keep a straight line from head to knees. Look at the floor and breathe slowly. Hold for 10 to 20 seconds, rest a minute, and repeat for three sets.
How long should a beginner hold a plank?
A beginner should hold a plank for 10 to 30 seconds with good form. Mayo Clinic’s physical therapists suggest working toward at least 30 seconds, then 60. Start lower if your hips sag, and add 5 to 10 seconds only when your form stays clean.
Is a 30-second plank good?
Yes. A 30-second plank with a flat back and steady breathing is a solid goal for most beginners, and it meets Mayo Clinic’s minimum target. It beats a two-minute plank with sagging hips. Men’s Health also says 10 to 30 seconds is plenty for many people.
Should I do planks every day?
You can plank daily if your holds are short and nothing hurts, but you don’t need to. Lawton suggests two to four times a week. Beginners do well with three days a week and a rest day in between. Take a day off if your lower back or shoulders feel sore.
Should I do a plank on my hands or elbows?
Either works. The forearm plank challenges your core more and is typically easier on your wrists. The hand plank loads your shoulders and triceps more, according to Men’s Health. Learn the forearm version first, then try the hand version for variety. Keep one straight line in both.
Why do I feel planks in my lower back?
Usually your hips sag or your back arches, so your lower back works in place of your core. Squeeze your glutes, pull your ribs down, shorten the hold, or drop to your knees. Acibadem’s guide adds that back pain can also come from weak trunk support or an existing spine problem. Sharp or lasting pain needs a doctor or physiotherapist.
Can I do planks at home without equipment?
Yes. You need only a floor. A mat or folded towel cushions your elbows, and your phone camera helps you check your form. A kitchen counter or sturdy bench works for incline planks. Lawton calls planking free and says it takes only a couple of minutes.
How long does it take to see results from planks?
Hold time typically rises within a few weeks of steady practice, though results vary. In the six-week ab study mentioned earlier, endurance improved even though belly fat didn’t change. Visible abs depend mostly on body fat, so pair planks with daily activity and sensible eating.